Posted 2017 June 21
I've been using my Mac mini Server (Late 2012) for some time now in a RAID 0 configuration (2 internal 1 TB hard drives, showing up in the Finder as a single 2 TB volume). When my hardware at work was upgraded from a Late 2012 Mac mini (single HD) to a Late 2014 Mac mini with a Fusion drive, I noticed a significant performance upgrade. Since some aspects of the Late 2014 model were not as good as the 2012 model (mostly 2 vs. 4 processor cores), I attributed the performance bump to the presence of an internal SSD.
Since I was taking up less than 700 GB of space on the internal drives of my Mac at home, I could afford to remove one of the two 1 TB hard drives, at least with regards to the amount of storage I needed. I knew I could create a Fusion Drive on my Mac mini so long as there was one internal SSD and one hard drive, so I decided to do that to improve my performance. This article documents the most effective way I found to do so and the resources I used, providing additional details along the way that would have been helpful to me.
What You Need
- A Mac mini (2011 or 2012) with two internal hard drives configured as a RAID (it's certainly possible to upgrade your single drive Mac mini to a Fusion Drive, but it requires an extra drive mounting kit and many more steps, so it will not be discussed here)
- External storage for backups with at least the capacity of your two internal drives (in my case, I needed at least 2 TB)
- An external bootable disk/volume with Disk Utility and Terminal included (you may want a macOS Recovery partition as well)
- 2.5" SATA Solid State Drive (I chose a 250 GB Samsung SSD 850 EVO)
- Torx T6, Torx T8, and 2.0 mm Hex screwdrivers (I had a 15-piece set from The Source that is no longer available, but you could choose the NewerTech 11-piece set, which also has a pry tool that could be handy)
- A static-free work surface (at work, I have an anti-static mat and a wrist strap, but at home I had to settle for a wood table on a wood floor with something grounded nearby to regularly discharge static; the OWC web site has a very informative page on static that I recommend you read)
- Optional: External 2.5" drive enclosure (so that you can repurpose the hard drive that gets removed; I chose a Vantec NexStar 6G USB 3.0 enclosure with which I have had good success at work).
- Optional: A current macOS Installer (e.g., Install macOS Sierra)
- Optional: AutoDMG, the Open Source software tool from Per Olafsson that modularly creates a bootable macOS volume in a disk image, suitable for block-coping
Overview of the Process
- Backup all the things. Redundantly
- Create (or Retrieve) an External Boot Drive/Volume
- Perform Mac mini Surgery
- Create the Fusion Drive
- Add a macOS Recovery Partition (optional)
- Restore All Your Data to the Fusion Drive
- Repurpose the Leftover Hard Drive (optional)
Step 1: Backup all the things. Redundantly.
I use Time Machine for my day-to-day backup using a Time Capsule on our home network. I also periodically make a full backup of my boot drive using Disk Utility, which I then store off site. I made certain both of those were current. Specifically:
- From the Time Machine menu extra (or from System Preferences > Time Machine), select Backup Now and wait until the backup completes.
- Boot from an external drive with Disk Utility, open Disk Utility, select the RAID volume from the Mac mini in the left sidebar and then select File > New Image > Image from [Name of my RAID volume] or press Command-Option-N. Store the image on an external drive. When the image of your boot drive is complete, then scan that image file so that it can be restored (Image > Scan Image for Restore…).
- Boot from an external drive with Disk Utility, open Disk Utility, select in the left sidebar a blank volume/partition (at least 2 TB in size in this case) on an external drive, and ask to Restore the RAID volume to it (Edit > Restore or Command-Shift-R, and then select the internal RAID volume). Read the dialogue box carefully, making certain you erase the blank disk and not your source RAID volume.
If you are using a Time Capsule or other network drive for a Time Machine backup, make certain you know both the password to connect to the Time Capsule/device and the password to access your files (commonly needed if there is more than one user backing up to the same device).
Step 2: Create (or Retrieve) an External Boot Drive/Volume
If you own a tool like TechTool Pro or you use DeployStudio, you may already have a bootable USB Drive that has Disk Utility and Terminal on it. Perhaps you even have a bootable external hard drive or SSD with a full version of an OS that your Mac mini can run (in this case, OS X 10.8.1 or later ). If so, and you don't care if your new setup has a local Recovery Partition installed (since you've been operating without one anyway), you can skip ahead to Step 3.
Otherwise, I'd recommend you do one of two things:
- Manually install a current OS on an empty volume/partition of an external drive (minimum 30 GB in size); or
- Use AutoDMG and a current OS installer to create a disk image that you then copy to an empty volume of an external drive using Disk Utility (again, 30 GB or larger is best, although you can get away with less).
The AutoDMG method is the more robust one, because the disk image will include a Recovery Partition — that comes in handy in Step 5 should you choose to do that optional step. It also gives you a base for creating a quickie external boot drive. It's probably worth a separate blog post to describe this. For now, since I presume readers of this blog can install an OS on a blank volume, I will not elaborate further.
Step 3: Perform Mac mini Surgery
Swapping in the new SSD for the old hard drive is slightly tricky, but I found it to be manageable — and this is from someone who is more software-oriented than hardware-oriented. By far the easiest way to do this is to follow the instructions in the OWC video on replacing the drive on a Mac mini with a single drive installed. Use the instructions for the single drive model because you will only be replacing the first (and easiest) drive, and as such should not need to do special handstands like removing the logic board (as is necessary if you are replacing both drives). If you'd prefer a list of steps in text, iFixIt also has a guide.
A couple of notes from my experience doing the swap:
- Reconnecting the WiFi connector is a lot harder than it looks, especially if your Mac mini has that flap in the way. Take some time when disassembling to see the position you will need to replicate. In the end, I finally got it aligned with the help of a small screwdriver (which also held back the flap). Once I had it aligned, I removed the screwdriver and pressed down on the flap and connector, giving me the best vertical alignment when pressing down. (My earlier attempts were always at an angle slightly off vertical and would not connect.)
- My replacement SSD was much thinner than the hard drive it replaced. When you screw in the two Torx 8 screws into the grate holding the WiFi hardware (about 6 minutes in to the OWC video), the screws are meant to be received by the drive you just installed. In my case, there was enough play there that it would not catch reliably. I ended up flipping the Mac mini to its normal upright position so that gravity would cause the SSD to rest on the grate. I could then hold the Mac mini in the air and insert those two screws from underneath, successfully connecting with the screw holes on the SSD.
Step 4: Create the Fusion Drive
Note: There is no turning back once you start this step. The data from the original RAID will be destroyed.
The Mac mini needs to be booted from an external drive. I had a OS X 10.10 (Yosemite) boot drive handy, so I chose that. (I guess you could use Internet Recovery if absolutely necessary, since it does give you access to Terminal.) Once I was booted, I got notified of the blank disk, with the GUI requesting whether I wanted to format it or not. Since I knew I was going to erase it in a minute, I responded by clicking the Ignore button in the dialogue box.
Here's what the drive setup looked like in Disk Utility (10.10 version) before we created the Fusion Drive:
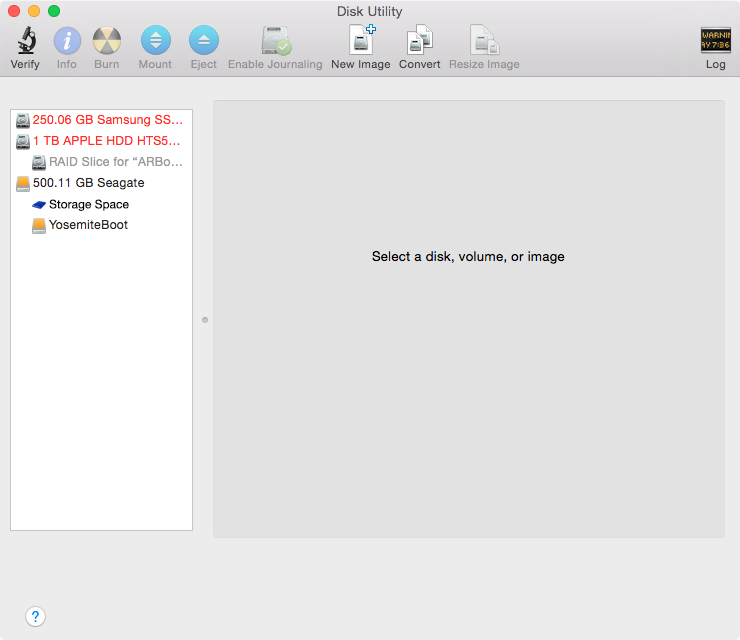
And here's the view from terminal:
$ diskutil list
/dev/disk0
   #:                       TYPE NAME                    SIZE       IDENTIFIER
   0:                                                   *250.1 GB   disk0
/dev/disk1
   #:                       TYPE NAME                    SIZE       IDENTIFIER
   0:      GUID_partition_scheme                        *1.0 TB     disk1
   1:                        EFI EFI                     209.7 MB   disk1s1
   2:                 Apple_RAID                         999.9 GB   disk1s2
   3:                 Apple_Boot Boot OS X               134.2 MB   disk1s3
/dev/disk2
   #:                       TYPE NAME                    SIZE       IDENTIFIER
   0:      GUID_partition_scheme                        *500.1 GB   disk2
   1:                        EFI EFI                     209.7 MB   disk2s1
   2:                  Apple_HFS Storage Space           450.0 GB   disk2s2
   3:                  Apple_HFS YosemiteBoot            49.1 GB    disk2s3
   4:                 Apple_Boot Recovery HD             650.0 MB   disk2s4
So using the above information, I created a Fusion Drive from Terminal (using an Admin account). Because I want to erase both internal drives, I just specified the two disks (disk0, disk1) rather than mess around with creating and picking the right volumes. Besides, the SSD was completely blank, so the diskutil command does the right thing by default on that disk: format it using a GUID Partition Table and add an HFS+ Journaled volume.
So based on the information from diskutil list (above), I used this command to create the new Fusion drive:
sudo diskutil cs create Fusion1TB disk0 disk1
Note: cs stands for CoreStorage; you may use the form diskutil coreStorage … if you prefer. You can also name the grouping of the two drives whatever you like (I chose Fusion1TB).
The Terminal output will look something like this (progress indicators may also appear):
Password:
Started CoreStorage operation
Unmounting disk0
Repartitioning disk0
Unmounting disk
Creating the partition map
Rediscovering disk0
Adding disk0s2 to Logical Volume Group
Unmounting disk1
Repartitioning disk1
Unmounting disk
Creating the partition map
Rediscovering disk1
Adding disk1s2 to Logical Volume Group
Creating Core Storage Logical Volume Group
Switching disk0s2 to Core Storage
Switching disk1s2 to Core Storage
Waiting for Logical Volume Group to appear
Discovered new Logical Volume Group "F41B791C-B01C-46FA-B9BC-AF89CE426AA6"
Core Storage LVG UUID: F41B791C-B01C-46FA-B9BC-AF89CE426AA6
Finished CoreStorage operation
So we now have a Logical Volume Group (in this case, a Fusion Drive setup), but no formatted Volume that we can use. That's the next step. You'll notice at the very end of the output from diskutil cs create that it gives the UUID for the new Logical Volume Group. Copy that and insert it into the following command:
sudo diskutil cs createLV [UUID] jhfs+ [VolumeName] 100%
This creates a Logical Volume in the Journaled HFS+ format which will be named whatever we type in for [VolumeName]. The 100% indicates that we want to use all of the space available for the volume. Here's what my command looked like:
sudo diskutil cs createLV F41B791C-B01C-46FA-B9BC-AF89CE426AA6 jhfs+ ARBootFusion 100%
Success! This is what Disk Utility reports now:
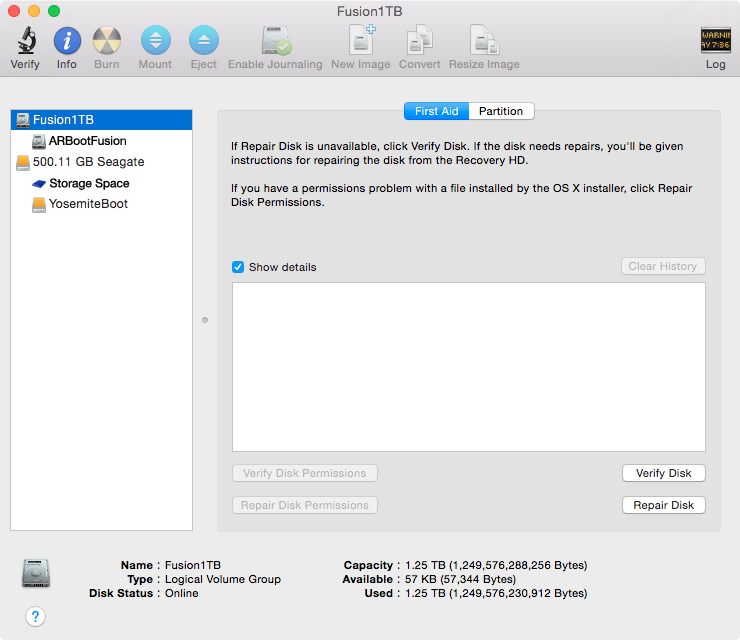
And here's what the output of diskutil list looks like:
/dev/disk0
   #:                       TYPE NAME                    SIZE       IDENTIFIER
   0:      GUID_partition_scheme                        *250.1 GB   disk0
   1:                        EFI EFI                     209.7 MB   disk0s1
   2:          Apple_CoreStorage                         249.7 GB   disk0s2
   3:                 Apple_Boot Boot OS X               134.2 MB   disk0s3
/dev/disk1
   #:                       TYPE NAME                    SIZE       IDENTIFIER
   0:      GUID_partition_scheme                        *1.0 TB     disk1
   1:                        EFI EFI                     209.7 MB   disk1s1
   2:          Apple_CoreStorage                         999.9 GB   disk1s2
   3:                 Apple_Boot Boot OS X               134.2 MB   disk1s3
/dev/disk2
   #:                       TYPE NAME                    SIZE       IDENTIFIER
   0:      GUID_partition_scheme                        *500.1 GB   disk2
   1:                        EFI EFI                     209.7 MB   disk2s1
   2:                  Apple_HFS Storage Space           450.0 GB   disk2s2
   3:                  Apple_HFS YosemiteBoot            49.1 GB    disk2s3
   4:                 Apple_Boot Recovery HD             650.0 MB   disk2s4
/dev/disk3
   #:                       TYPE NAME                    SIZE       IDENTIFIER
   0:                  Apple_HFS ARBootFusion           *1.2 TB     disk4
                                 Logical Volume on disk0s2, disk1s2
                                 6D958E51-9765-4200-A21C-C318654D3B2F
                                 Unencrypted Fusion Drive
Step 5 (Optional): Add a macOS Recovery Partition
The one downside of using a RAID as your boot drive is that you can't have a (local) macOS Recovery partition. (You can't partition at all for that matter.) So if you want to have one, now is the time to put it in place. There are two good ways I can think of to do this:
- Install the OS on the new Fusion Drive (Logical Volume), which will automatically create a macOS Recovery partition along the way; or
- Use the core system disk image you may have created with AutoDMG in Step 2 and use Disk Utility to copy it to the new Fusion Drive volume (the embedded macOS Recovery partition will also be copied).
In either case, when we're done, we should end up with something like this if we run diskutil list at the command line:
/dev/disk0 (internal, physical):
   #:                       TYPE NAME                    SIZE       IDENTIFIER
   0:      GUID_partition_scheme                        *250.1 GB   disk0
   1:                        EFI EFI                     209.7 MB   disk0s1
   2:          Apple_CoreStorage Fusion1TB               249.7 GB   disk0s2
   3:                 Apple_Boot Boot OS X               134.2 MB   disk0s3

/dev/disk1 (internal, physical):
   #:                       TYPE NAME                    SIZE       IDENTIFIER
   0:      GUID_partition_scheme                        *1.0 TB     disk1
   1:                        EFI EFI                     209.7 MB   disk1s1
   2:          Apple_CoreStorage Fusion1TB               999.3 GB   disk1s2
   3:                 Apple_Boot Recovery HD             650.0 MB   disk1s4

/dev/disk2 (internal, virtual):
   #:                       TYPE NAME                    SIZE       IDENTIFIER
   0:                  Apple_HFS Macintosh HD           +1.2 TB     disk2
                                 Logical Volume on disk0s2, disk1s2
                                 DF407B4D-9104-4F89-8EAB-25F5F29F614F
                                 Unencrypted Fusion Drive
Note that on the 1 TB hard drive, disk1s3 is gone, disk1s2 is smaller, and a Recovery partition of 650 MB has been created at disk1s4. So in addition to a Recovery partition, we also have an OS installed. You might also notice that the Fusion Drive volume changed to Macintosh HD, since I used the AutoDMG method and the default name for the drive is Macintosh HD (you can change that before you build the image; I didn't). If you did a manual install of the OS, do not go through any of the Setup Assistant steps that are presented on a fresh install (at least, not quite yet).
Step 6: Restore All Your Data to the Fusion Drive
This part actually tripped me up in an unexpected way. I had two backups: a network backup to my Time Capsule and a 670 GB (compressed) disk image. I had a clean OS installed, so I opted to restore from Time Machine when prompted by Setup Assistant — well, I would have if I had the necessary passwords in front of me. My wife's computer also connected to this same Time Capsule, so I was able to retrieve the password (from her Keychain) to connect to the device, but I could not come up with the password to access my machine's backup. Of course, this information is in my own Keychain (and, in my case, in a database as well), but since I have no access to my data right now, I need to go to Plan B.
Plan B was to take the disk image I created of all my data and clone it to the Fusion Drive. Since Disk Utility can do this, I can boot from the same drive I used when backing the Mac mini up and restore using Disk Utility… or at least I thought I could. Unfortunately, when I tried to do that, Disk Utility claimed that there was a size mismatch and that the contents of the disk image could not be copied. Yes, even though there was less than 1 TB of data inside the disk image, it remembered it came from a 2 TB RAID and thus refused to restore to the smaller drive.
So if I had chosen to not make the disk image and just make a copy of my Mac mini RAID to a 2+ TB external volume, I would have been better off in this case. But since I didn't, I needed to go to Plan C: take that disk image backup and Restore it to a 2 TB volume on an external disk using Disk Utility.
Regardless if you took my circuitous route to get to this point or not, you are now ready to restore your data. Here's I followed through with Plan C:
- Boot from any external volume (or from the macOS Recovery partition you may have created in Step 5). Make certain the disk with the data you wish to restore is also connected and available.
- Using Disk Utility, reduce the size of the volume holding your source data to less than the size of the Fusion Drive (I added a second blank partition taking all but 1 TB of space, which then reduced my source data volume to 1 TB).
- Using Disk Utility, Restore the data from the source data volume to the Fusion Drive. Note: Be very careful that you don't copy the contents of your Fusion Drive to the volume with your source data. Just like you may have done in Step 1 of this guide, you select the target volume in the sidebar (in my case, the ARBootFusion volume we created on the Fusion Drive) and then selecting Edit > Restore… or pressing Command-Shift-R. In this case, it's really helpful if the source data and the target drive don't have the same name (don't worry, they will when you're done).
If you, however, have access to your Time Machine backup, you can choose to restore from there. If you have a valid macOS Recovery partition, that's probably easiest, as the Restore from Time Machine Backup is the first choice in the menu; just start it off and follow the steps. Alternately, if you chose to install an OS on your Fusion Drive in Step 5, you could boot from that and proceed through Setup Assistant to the point where it asks if you want to restore from Time Machine.
As a final alternative — which is most useful if you were living dangerously and decided you should upgrade your OS to a new major version at the same time (e.g., from El Capitan to Sierra) — you can accept any OS you installed on the Fusion Drive and just migrate your data using Migration Assistant, either at initial startup or from /Applications/Utilities any time after you have established an account on the new boot volume.
Step 7 (Optional): Repurpose the Leftover Hard Drive
Since I had a 1 TB 2.5" drive left over, I purchased an external USB 3.0 enclosure for it. You would think it would be trivial to get that up and working — and the hardware part was — but Disk Utility held fastidiously to the belief that this drive was part of a RAID and it would not let me divorce it from said configuration no matter what I tried. So it became necessary to repurpose it using the command line. Here are the steps:
- Determine the disk number of the drive we want to erase using
diskutil listas we did earlier. The listing for my blank disk looked like this (your details may vary):/dev/disk4 (external, physical): #: TYPE NAME SIZE IDENTIFIER 0: GUID_partition_scheme *1.0 TB disk4 1: EFI EFI 209.7 MB disk4s1 2: Apple_RAID 999.3 GB disk4s2 3: Apple_Boot Boot OS X 650.0 MB disk4s3
- Enter the following command at the command line (replace
External1TBwith whatever name you want anddisk4with the disk identifier that you determined fromdiskutil list):diskutil eraseDisk jhfs+ External1TB disk4
diskutil list should now report something like this for your newly-formatted disk:
/dev/disk4 (external, physical):
   #:                       TYPE NAME                    SIZE       IDENTIFIER
   0:      GUID_partition_scheme                        *1.0 TB     disk4
   1:                        EFI EFI                     209.7 MB   disk4s1
   2:                  Apple_HFS External1TB             999.9 GB   disk4s2
It should now also show up in the Finder and as an active volume in Disk Utility.
Errors? Clarifications? Contact me on the Mac Admins Slack (jazzace) or on Twitter (AnthonyReimer).