Posted 2017 August 12
For those of you who attended either of the workshops Vaughn Miller and myself led this year (in Calgary and State College), you’ll remember Vaughn mentioning that one of the strengths of the MacAdmins Slack is that it is a great venue for live, collaborative sleuthing and problem-solving. Equally, its weakness is that it’s hard to search for found solutions; Internet search engines can’t index Slack instances and the internal search finds comments, not solutions. So our community needs to document known problems on the public Internet, especially if a solution is known. Blogging is the dominant way this is currently done. So when more detail about what I blogged about last week came out in subsequent discussions in the MacAdmins Slack, a follow-up post seemed in order.
More On Imaging
The issue that generated further discussion was that imaging (i.e. deploying an actual disk image) meant potentially missing EFI firmware updates. First, let me describe what I did to work around the problem this year in my own Labs (35 seats total), since I am still deploying an image this year:
- Create an image using AutoDMG.
Contents: macOS Sierra 10.12.6, local users, LogicPro sounds/loops, text editor. - On the target Lab Macs, upgrade to/install the same version of the OS as is on the image.
On Macs that were still running 10.11.5, I used the full Sierra 10.12.6 installer; the remaining Macs (all running 10.12.x) used the updater. - Deploy the image and numerous packages to be installed on first boot.
I’m still using DeployStudio to install virtually all of my apps on first boot; you might be using Munki or Jamf Pro or another solution to deliver that payload.
As I suggested in my previous post, the alternative to this method (if you still need to image) was to update the firmware after deploying your image. Three ways to implement this option were suggested in the #security channel discussion:
- Make your image with a non-current point version of the target OS, then run Software Update to both apply the firmware updates and bring the OS up to date.
- Image as normal, then redundantly apply the macOS Combo Updater to apply the EFI firmware update.
- Pull the firmware update installer out of the macOS Combo Updater and install it on reboot after imaging (since it must be installed at startup).
Method 1 should work. Method 2 may work; I’d have to locate a Mac that I hadn’t already patched to test it. Method 3 definitely requires some skill, but Michael Lynn and Pepijn Bruienne both suggested in-channel that it should work using a “first boot” type of methodology, so I decided to investigate further.
Extracting The Firmware
First, a caveat. The assumption here is that you are installing the version of the EFI firmware that matches the version of macOS (or OS X, as the case may be) you are deploying. Installing EFI firmware later than your OS expects can lead to unexpected results. Now on with the research!
I grabbed the huge macOS Sierra combo updater and went spelunking for the firmware updater. The first tool I used was Suspicious Package. Because the Combo Update package was so large and complex, it made sense to examine it in the full Suspicious Package app rather than just using the QuickLook plug-in. I didn't immediately discover it, but when I checked the Scripts tab, the sidebar showed two packages that had scripts. One of those was named FirmwareUpdate.pkg.

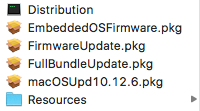
That package seemed to have updates for a large number of Mac models, so I went to extract it. It’s a modern flat package, so going to the Finder and asking to Show Package Contents will not work. Instead, I went to the command line. With the installer .dmg mounted, I issued this command: pkgutil --expand /Volumes/macOS\ Sierra\ Update/macOSUpd10.12.6.pkg ~/Desktop/combo (you can pick any path you like for the destination, so long as the user has permissions to create the directory you name — in my example, ~/Desktop/combo did not yet exist). When I did this, I could now see four packages, one of which was FirmwareUpdate.pkg.
As was mentioned in the MacAdmins Slack, FirmwareUpdate.pkg cannot be run like a normal installer package. Suspicious Package can’t understand it, double-clicking to install doesn’t work, examining its contents using Show Package Contents does work but it is essentially what we saw in Suspicious Package earlier in the Scripts tab. If you think you can use this information to add the firmware updates you need to your existing workflow without actually installing a complete system or security update, more power to you. In fact, please document this for the community like I’m doing right now. I’ll happily link to it [Update: Allister Banks has done just that]. People whose knowledge I trust say it should work in the right circumstances. For me, my scale is small enough that I am happy with the solution I used.
Finally, a couple of tips that I learned while doing this research. I don’t have to expand the flat package to see what packages are inside of it, I just need to read the Bill of Materials (Bom). One method is using the command line. For example, I can examine the 10.12.6 Combo Updater using this command: pkgutil --bom /Volumes/macOS\ Sierra\ Update/macOSUpd10.12.6.pkg, which returns this list:
/tmp/macOSUpd10.12.6.pkg.boms.SFMD0A/EmbeddedOSFirmware.pkg/Bom
/tmp/macOSUpd10.12.6.pkg.boms.SFMD0A/FirmwareUpdate.pkg/Bom
/tmp/macOSUpd10.12.6.pkg.boms.SFMD0A/FullBundleUpdate.pkg/Bom
/tmp/macOSUpd10.12.6.pkg.boms.SFMD0A/macOSUpd10.12.6.pkg/Bom
Alternately, Suspicious Package will let you read the complete Distribution XML file for the package if you enable “Show: Distribution Script” in Preferences. It will be shown as the first item in the sidebar of the Scripts tab. You have to look a little harder to see the list of packages, but it is there.
Updated 2017-09-03 with a link to Allister Banks’ article on building a standalone firmware update pkg.