Posted 2023 August 03
After Elliot Jordan and I presented our workshop on understanding, selecting, creating, and maintaining AutoPkg recipes, I reflected on the content we were able to fit into that one-day workshop and what we couldn’t. We each gave personal tips on things that make our AutoPkg environment more effective, but as a follow-up to that workshop, I thought it might be useful to describe my AutoPkg environment as a whole, putting the various tips I mentioned in the workshop all in one place plus some other things that didn’t make the cut. I’m going to make no assumptions about macOS literacy, so some instructions may be more verbose than you personally need, but I want to reach the widest possible audience.
Text Editor
My text editor of choice is BBEdit. I pay for the full version (US$50, upgrade pricing available), but a number of the tips I show here can also be used in the free version. There are many good text editors with code support, so you should be able to implement similar conceptual things in your editor of choice. (Fort example, both of my most recent co-presenters, Elliot Jordan and Graham Pugh, use Visual Studio Code to author recipes, adding Extensions to implement some of these same features.)
BBEdit allows you to reassign keyboard shortcuts for menu items. This is done in BBEdit’s Settings (Command-comma) in the Menus & Shortcuts tab. I have made two changes:
- I assign Command-/ to Markup > Close Current Tag. Thus, if I am manually typing
<key>or<string>tags in my plist recipes (e.g., when I add additional arguments), I can just press Command-/ to close the tag instead of typing</key>or</string>respectively. - I assign Control-A to the command that makes my recipes more standards-compliant (more on that later).
Finder and Dock
In the Finder, I have any file with the .recipe extension open with BBEdit. To set this up, simply select any AutoPkg recipe with the .recipe extension in the Finder, then Get Info (Command-I or File > Get Info). From the window that appears, in the “Open with:” section, choose BBEdit from the pop-up menu then click on the “Change All…” button to make all files with the .recipe extension open with BBEdit. I have done the same for YAML recipes (which end in .recipe.yaml).[1]
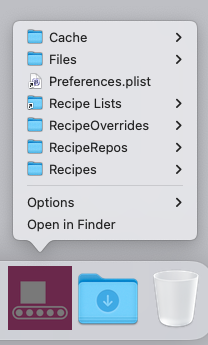
By default, the Cache, RecipeRepos, and RecipeOverrides folders are stored in the local user’s AutoPkg folder, ~/Library/AutoPkg, where ~ is the UNIX abbreviation for the user’s home directory. (If you use Recipe Robot, the Recipe Robot Output folder will also be there.) For easy access to its contents, I have dragged the folder into the right side of my Dock to make it available at all times. I have configured it to use List view, which I chose by right-clicking (Control-clicking) on the icon in the Dock and selecting View content as List. I have also have assigned the AutoPkg logo as the custom icon for the folder to differentiate it. I did that by copying the icon from the AutoPkg GitHub account to the clipboard, then bringing up the Get Info window for the folder as I did earlier, then selecting the folder icon in the top left corner of the window, then pasting the logo from the clipboard (Command-V).
If you use the Finder sidebar for favourite locations, adding the AutoPkg folder there (by dragging the folder onto any Finder window sidebar) is also useful, as then it is available in Open and Save dialogue boxes as well.
Other Important Folders and Files
From the screenshot shown above, you’ll notice that I have more items in the ~/Library/AutoPkg folder than the default three folders. Let me describe them as they appear alphabetically:
- Files
- I have a few applications that require that I place certain files in certain places on the target computer (usually unique licence or server information). When I have automated the placement of these files (e.g., by building a custom package installer), I put the source files here for easy reference.
- Preferences plist
- This is a Finder alias to
~/Library/Preferences/com.github.autopkg.plist. I created it by selecting the file in the Finder, then using the Make Alias command (File > Make Alias or Control-Command-A), and moving the alias to the AutoPkg folder, renaming the alias as desired.[2] This gives me easy access to the current preferences (settings?) in case something goes awry. You may find this unnecessary, since runningdefaults read com.github.autopkgwill output the same information. I don’t use this often. - Recipe Lists
- If you have ever used AutoPkgr to run multiple recipes, you will know that it creates recipe lists from recipes you have checked in the lower pane. It can create multiple lists, in fact, and let you quickly switch between them. It stores the lists it creates in
~/Library/Application Support/AutoPkgr, so I use the same technique I just described to make a Finder alias to the AutoPkgr folder, renaming it Recipe Lists, since that is all that gets stored in that folder. Putting an alias here helps make all my AutoPkg-related files available in one central location. - Recipes
- This is a folder I create manually in this location with this exact name. When searching for recipes (e.g., when you
autopkg runa recipe), by default, AutoPkg checks the current working directory first, then~/Library/AutoPkg/Recipes. Any repositories you have loaded (even the corerecipesrepo) are searched after that. AutoPkg stops searching as soon as it finds a match. That makes~/Library/AutoPkg/Recipesa great location to store recipes you are currently developing, including updates to existing recipes, and recipes that are only local to your Mac.
Recipe Writing Aids — Templates and Clippings
AutoPkg recipe authors do not generally start with an empty text file and begin typing. Most commonly, they use a template of some sort:
- Copy and alter an existing recipe;
- Use the new-recipe verb (
autopkg new-recipe) to create a basic recipe framework; - Use Recipe Robot to generate a recipe(s) that you then edit as needed; or
- Use a template that someone has authored for a specific kind of child recipe where the steps are frequently the same.
While I have used all of these methods to start a new recipe, it is this last kind that I can add directly to the menus in BBEdit.
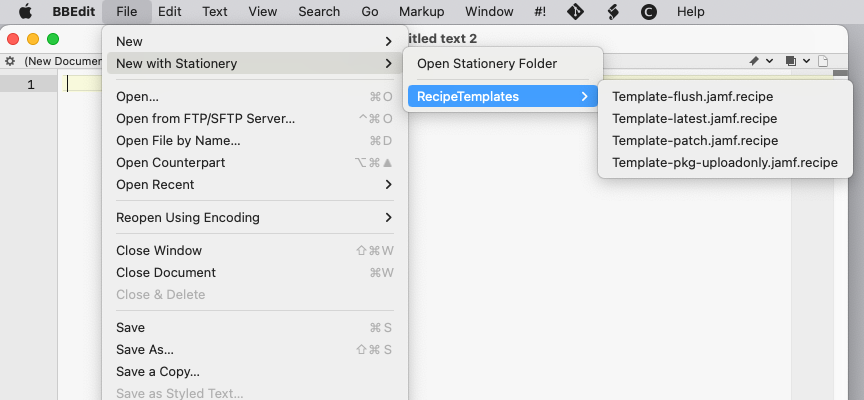
In the File menu in BBEdit, you will see New with Stationery, which has a submenu that lists all the stationery items (templates) you have preloaded. If you want to add items, choose Open Stationery Folder from the submenu, which will open a Finder window at ~/Library/Application Support/BBEdit/Stationery. You can add files or folders here. In my jazzace-recipes GitHub repo, I have my .jamf recipe templates stored in JamfTemplates/RecipeTemplates.[3] Using the same Finder alias trick I used previously, I made an alias of ~/Library/AutoPkg/RecipeRepos/com.github.autopkg.jazzace-recipes/JamfTemplates/RecipeTemplates and moved it to that Stationery folder. Now when I view File > New with Stationery, there is a submenu that lets me select from all my .jamf templates, which opens an untitled copy of the recipe template for me to use.
Once I have started a new recipe from my desired template (using any of the methods mentioned), I will often need to add additional processor steps. You can certainly copy and paste processors from existing recipes, but I have found it useful to keep common processors handy in BBEdit’s Text Clippings. (This is a feature of the paid version of BBEdit, but you can certainly replicate it with other tools that you may already be using, such as Keyboard Maestro, TextExpander, TypeIt4Me, or even the text expander function in macOS Keyboard settings.)
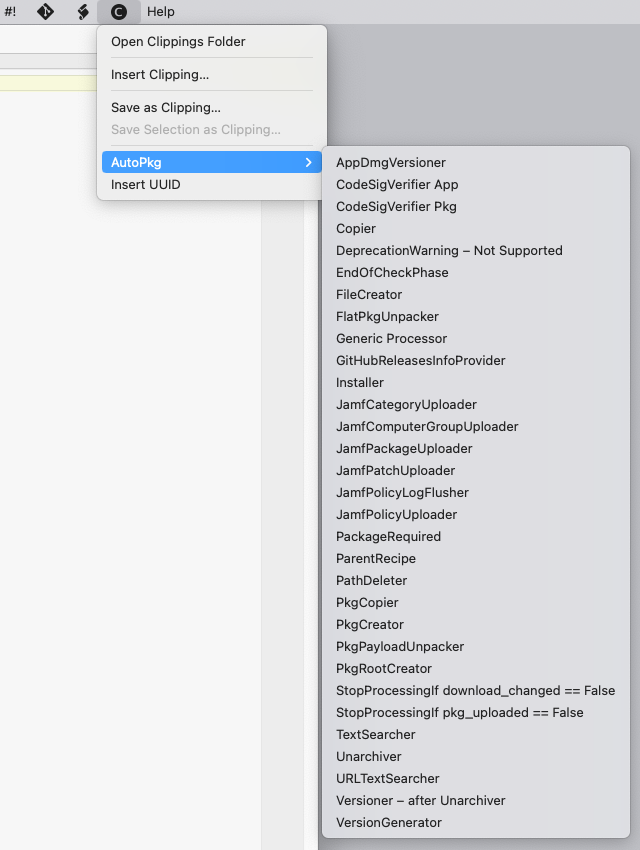
The location of the BBEdit text clippings folder is ~/Library/Application Support/BBEdit/Clippings, which you can also open by selecting Open Clippings Folder from the Clippings menu (the letter C superimposed on a filled circle in the menu bar). Generally, I don’t have to remember that bit because the most efficient way to create clippings is to select the text you want in any file open in BBEdit (in my case, full lines of text for a common processor), then select Save Selection as Clipping… from the Clippings menu, then give the clipping a name — I usually choose the processor name, but it can be anything you want. So, for example, I have two clippings for CodeSignatureVerifier which I have named differently: one for when we are verifying an app bundle and one for when we are verifying a pkg installer. BBEdit also allows you to create sets of clippings, which then become sub-menus to Clippings. (I have clippings sets for AutoPkg as well as for the footnotes I add for this blog, which I also write in BBEdit.) Since sets are implemented as folders inside the Clippings folder in the Finder, you are able reorganize your clippings. If you need to edit your clippings, they are stored as text files.
You can use your clippings in one of three ways: (1) select the desired clipping from the Clippings menu, (2) use the Clippings > Insert Clipping… menu command to bring up a palette of clippings to choose from, or (3) start typing the name of the clipping and select it from the pop-up list that appears.[4] In all of these cases, the clipping will be inserted wherever the cursor is. Even though BBEdit is really good at automatically indenting when you write structured text like an AutoPkg plist recipe, I choose to ignore this in my clippings since processors will always be indented the exact same amount. So my clippings are full lines of markup with indents — I place the cursor at the beginning of the line where I want my new processor inserted.
As a part of a previous presentation, I started sharing my clippings on GitHub in my BBEdit-AutoPkg-Clippings repo. It has grown to over 30 clippings since I started it, so it could be a useful resource for many of you — no Munki clippings, though. You are welcome to simply copy my clippings, but if you want to get new ones when I add them, you can use Git to make a local copy of that repo in ~/Library/Application Support/BBEdit/Clippings/AutoPkg and then sync periodically to pickup any additional clippings. For example, in GitHub Desktop, you can choose Clone Repository… from the File menu (Shift-Command-O), then in the resulting window click on the the URL tab and enter jazzace/jazzace/BBEdit-AutoPkg-Clippings for the username/repository and then name a folder within the BBEdit Clippings folder (which does not need to exist) as the local path. I simply use AutoPkg as the name of the local folder, which then becomes the name of my Clippings set.[5]
Shell Aliases
Because I never learned to touch type (we had literal typewriters when I was in High School), I like to minimize my typing — and typing errors — at the command line by leveraging UNIX shell aliases. Essentially, this allows me to define my own shell commands. For example, I can type apr MyNewRecipe.download at the command line and, because I have declared an alias where apr is an abbreviation for autopkg run -vv, it is interpreted as if I typed autopkg run -vv MyNewRecipe.download. You can choose whatever abbreviations make sense to you; they don’t even have to be shorter than the original command. They just need to be one “word” at the beginning of a command (shell commands use a space as delimiter, so your alias can’t contain a space).
You define a shell alias using the alias command. Issuing the command with no arguments gives you a list of the aliases currently in effect for this Terminal session. The form is aliasname='what the alias stands for'. To define an alias, use this form as the argument to the alias command. In the example above, I defined the apr alias with the following command:
alias apr='autopkg run -vv'
It would be tedious if we had to type these aliases in each session, so there is a solution for this. If you are using the default Terminal shell in macOS (zsh), every time the shell starts up, the contents of ~/.zshrc are loaded and processed. (If you are still using bash as your shell, the file is ~/.bashrc, although ~/.bash_profile also works for this.) If you save your alias commands (one per line) in that file, you can create an environment that makes using AutoPkg at the command line easier. Note that since the filename starts with a period, it will normally be invisible in the Finder. Luckily, BBEdit automatically shows such files when you issue a File > Open command.
I’ve posted a slightly edited version of my current .zshrc file to my MacAdmin-Scripts repo on GitHub, which you can adapt for your own use if you like. I’d like to highlight a few key aliases:
- aprt
- I use this alias when I am testing a new or updated recipe. The command that gets run,
autopkg run -vv --ignore-parent-trust-verification-errorslets me turn off trust verification for just this run because a new recipe will fail trust verification until I create an override, and a recipe with an override will fail if I am editing any recipe in the chain. This is how I prefer to do my testing. At one time, I completely turned off trust verification and then turned it back on again when I was done (and those aliases are still in the file for demonstration purposes), but I forgot to turn trust verification back on often enough that ignoring individual runs was much safer. - codesigapp and codesigpkg
- When I need to obtain what CodeSignatureVerifier requires for verification, I don’t have to remember the exact syntax of the command (or which is which).
- verifylist and verifydiff (or apvt or verifyrecipe)
- As I explained in the MacAdmins Conference workshop, I like to have AutoPkg verify my standard recipe list with a simple OK/FAILED result, so my
verifylistcommand doesn’t even require an argument because it specifies my main list (you could write it differently). Once I know which recipes trigger an issue, I then use theverifydiffcommand with each of the recipes that failed to show me what changed. You can issue them as separate commands or specify multiple recipes using a single command. - updatejazz
- This updates my jazzace-recipes repo in AutoPkg on the current Mac, which is useful just after I have uploaded a change to that repo. I can then update the trust on the recipe override(s) that use the recipe(s) I just changed (e.g., using my
updatetrustalias).
As a bonus, I’ve left in my custom shell prompt, which is also stored in ~/.zshrc — if you want to learn more about that, I recommend Armin Briegel’s book Moving to zsh or his blog post on Customizing the zsh Prompt.
Syntax Checking and Standardizing
One of the things I learned from working with Elliot is the importance of making my recipes as clean and as standardized as possible. While I can do these checks at the command line, I can also leverage BBEdit’s built-in functionality and extensibility to do these things.
First: Syntax Checking. BBEdit is built to check the syntax of HTML, and thus XML. Since I write all my recipes in plist format (which is also XML), I can use the Check > Document Syntax command from the Markup menu (or Control-Command-Y) in the paid version of BBEdit to check for syntax errors. If your editor doesn’t have such a checker or if you prefer to do this outside your editor, you can use the command line command plutil -lint /path/to/recipe to check for errors.
Second: Standardizing. The plutil command has an option to “convert” any plist to version 1 of the XML plist format (which is what we are using for recipes). Running plutil -convert xml1 /path/to/recipe will do a few things that recipe authors might notice:
- Replace all indenting with tabs;
- Strip any comments created using the
<!-- insert comment here -->syntax; - Sort all keys within dictionaries alphabetically.
It is a best practice to use this command on your recipes, as this is the standard that the maintainers would like to see in recipes within the AutoPkg organization. It also makes it easier to compare different recipes.
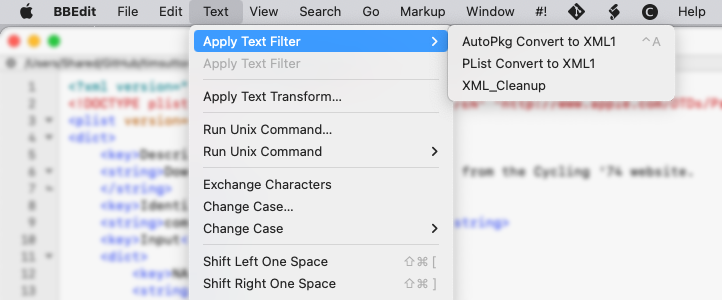
BBEdit has a nice feature called Text Filters, which seems to get its name from UNIX filters — those commands that take a stream of text and output a transformed stream of text (grep being particularly famous). When you run a Text Filter in BBEdit, the frontmost document (or the currently selected text in that document) will be used as input and the output from that command will replace the contents of the document (or selection). So we can use a variation of that plutil -convert xml1 command as a Text Filter in BBEdit to perform the standardization without leaving the editor. Place the following in a file and save it to the ~/Library/Application Support/BBEdit/Text Filters folder:
#!/bin/sh
# Convert current selection or frontmost file in BBEdit to xml1 format.
plutil -convert xml1 - -o -
The second line, which is a comment, is optional but recommended. I also recommend you save the file with a .sh extension; that extension will not show up in the Text Filter menu but will help BBEdit (e.g., syntax colouring). I have named that filter “Plist Convert to XML1.sh”.
If you don’t like how plutil processed your recipe, a simple undo will get you back to the file before the Text Filter was applied. Also, if you forgot to check the syntax first, the converter will fail if there is an error.
OK, dirty little secret time. While I do have this Text Filter on my system, I also have an additional one (“AutoPkg Convert to XML1”) which uses the sed command to change “Processor” to something that comes before “Arguments” in the alphabet, so that when I apply plutil -convert xml1, the Processor comes before its Arguments (I change its name back to “Processor” after the conversion).[6] I do this because I find it much more difficult to read recipes when the Processor comes after the Arguments, particularly when there are lots of Arguments. Note that most YAML recipe authors use this same Processor-first arrangement, so you will see both in the repos within the AutoPkg organization. I can’t recommend you do it the way I do it with plist recipes because it currently goes against the standard, but at least all my recipes are completely consistent and meet all other standards. Whenever I create a Pull Request on someone else’s recipe, I use whatever they are using. If it is inconsistent within the recipe, I consider adding a “clean up” commit within the Pull Request, favouring the standard over my personal preference.
As I mentioned off the top, I assign a keyboard shortcut to this converter (Control-A), so the final steps before I considering uploading a recipe to my repo are simple keystrokes (Control-Command-Y for syntax, Control-A for AutoPkg standards conversion, and Command-S to Save).
GitHub Repo
Finally, since I keep all my public recipes on GitHub, I have a place on my system for my GitHub repos, whether I created them or forked someone else’s work (usually to create a Pull Request): ~/Documents/GitHub. I use GitHub Desktop to download my repos to that location and keep the repos updated. Yes, this means I have two copies of my jazzace-recipes repo on my AutoPkg Mac: the copy I use when I want to make changes to my repo (~/Documents/GitHub/jazzace-recipes) and the copy that AutoPkg uses when running my recipes (~/Library/AutoPkg/RecipeRepos/com.github.autopkg.jazzace-recipes). I need to keep these separate, otherwise it can cause problems when using AutoPkg to update repos that I altered locally (don’t ask me how I know this).
I add ~/Documents/GitHub/jazzace-recipes to my Favorites (sic) in the sidebar of Finder windows for ease of access. Thus, my process when I need to update a recipe from my own repo is:
- Copy the recipe I want to edit from my repo to
~/Library/AutoPkg/Recipes(either Finder copy or open the recipe in BBEdit and Save As… to the Recipes folder). - Make the edits needed and go through my regular testing regimen.
- Once functional, re-check the syntax and standardize (as described above).
- Move the updated recipe from
~/Library/AutoPkg/Recipesto the original location of the recipe in the local copy of the GitHub repo (e.g.,~/Documents/GitHub/jazzace-recipes/VendorName/RecipeName.type.recipe), overwriting the previous copy (and not leaving a copy behind in~/Library/AutoPkg/Recipes). - Use GitHub Desktop to Commit the changes, then push them to GitHub.
- Update the copy of my recipe repo that AutoPkg uses (e.g., at the command line, run
autopkg repo-update jazzace-recipes.gitor the alias I have defined for that command). - Update trust for any overrides that use the updated recipe (since I wrote the code, I have already audited it; if it does bad things, my testing wasn’t good enough).
Take What You Like…
Honestly, I didn’t think it would take over 4000 words to describe my AutoPkg environment, but that’s what happens when you work with a product for almost a decade: you add things that reduce the friction (much like AutoPkg does itself). Whether you adopt any of my schemes or not, I hope this detailed post has given you some ideas on how you might make your own setup more effective.
[1] Technically, this maps all YAML files to the selected app (BBEdit) since .yaml is the file extension, but that is probably desired. Note as well that AutoPkg now supports naming plist recipes with .recipe.plist on the end, so you could map plists to your chosen editor using the same technique. [Return to main text]
[2] You can choose to create a symbolic link (ln -s) if you prefer. [Return to main text]
[3] I put the recipe templates two folders deep so that AutoPkg does not find them in recipe searches, since it only checks one level down. [Return to main text]
[4] The ability to load clippings by typing their name is a setting that can be turned off or on in BBEdit (BBEdit > Settings > Completion). If you turn it off (i.e., Show text completions: Only manually), you can trigger the completion pop-up by pressing F5 (by default) or selecting Edit > Complete. [Return to main text]
[5] Because I use AutoPkg (and BBEdit) on more than one Mac, I have GitHub Desktop store the local copy of the BBEdit-AutoPkg-Clippings repo in ~/Library/Application Support/BBEdit/Clippings/AutoPkg on each Mac. When I make a change, I then use GitHub Desktop to sync those changes to my GitHub repo, which I can then pull down on my other stations. If you work on more than one Mac or you wish to share your clippings with another user(s) on your team, creating your own repo and syncing it using Git in this manner is a great way to do it. [Return to main text]
[6] It’s not really a secret. I admitted to this back in 2020 during my presentation at the MacAdmins Campfire Sessions. My second Text Filter uses this command instead (side-scroll to see the whole thing):
sed s!\>Processor\</!\>AAAAProcessor\</!g | plutil -convert xml1 - -o - | sed s!\>AAAAProcessor\</!\>Processor\</!g
You lose the benefits that I mentioned earlier in the article of sticking with the simple conversion version, however. [Return to main text]